Tuesday, January 24, 2012

Revlon ColorBurst Lip Butter

Emma Stone is wearing "Peach Parfait"

I had to give this lip butter a try after I saw advertisements for the product everywhere.  Much to my surprise my local Targets were sold out of almost all the shades.  I was looking for a nude (creme brulee was my first choice) but when there were none available, I opted for the opposite, a dark shade.  I chose Fig Jam and I must say I am very surprised by the beauty of this color.  I love the lip butter because I can use one quick swipe for a soft hint of color and moisture or lay it on thick for a darker effect and soft lips.  It feels as though you have applied your favorite lip balm and the color does not run or feel dry like a lipstick.  Yes it is that moisturizing!  I recommend this lip butter to anyone who wants color of a lipstick with the natural feel of lip balm.  Revlon ColorBurst Lip Butter is available in 20 shades and at   most drugstores.  You can also purchase them at Target for around $7.  You better start hunting for your dream shade before they sell out again!
Revlon ColorBurst Lip Butter in Fig Jam

Monday, January 23, 2012

Product of the Week: Sally Hansen No Chip Acrylic Top Coat

Sally Hansen No Chip Acrylic Top Coat
This top coat is the best one out there.  I have used this top coat for six years and I have tried almost everything and nothing compares.  The acrylic top coat keeps polish from chipping, adds an amazing high gloss shine, and has a wide brush for easy application.  I recommend applying one coat to completely dry polish and let dry for around 20 minutes.  Be sure to close your cap tight when not using to preserve life of polish. It is also great for those in between moments to strengthen and harden nails.  It is available at most drugstores and at Target for around $4

Friday, January 20, 2012

Top 5 Friday:Voluminous Blowout Essentials


For those of you who need a voluminous blowout, here are your must have Top 5 essentials.

T3 Featherweight Professional Dryer
1. Blow Dryer
We all become attached to our dryers over time and do not replace them as often as we should. We use our dryers until they "burn out".  This can damage your hair as you should replace filters regularly.   An alternative is a higher performance dryer that will last over time.  I recommend T3 Featherweight Professional Dryer.  It is a little costly but it comes with replacement filters and has a two year warranty.  The dryer is lightweight, quiet, and dries hair 60% faster than other dryers.  It is healthier for your hair and leaves it with a silky touch and sheen without frizz.  You will be amazed at how much it cuts down your drying time. I simply could not live without my T3 and I recommend it to everyone.  Beware, this dryer can get extremely hot so you constantly have to keep your hands and brush moving to avoid exposure to skin and scalp.  It is available at Nordstrom and select beauty stores.  (If you prefer a less expensive alternative, be sure to look for two specific descriptions when shopping for a dryer, "ion" and "ceramic".  These will ensure your dryer will leave your hair soft and silky without drying it out or causing frizz.) 

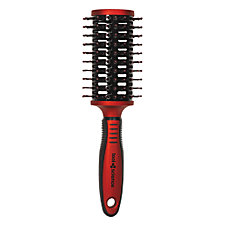
Tool Science Nano Silver Round Brush
  

2. Round Filtered Brush

A round brush is essential for a voluminous blowout.  As with any type of blowout, you should use a filtered brush as this helps leave no piece of hair untouched, leading to a faster blowout.  I recommend Tool Science Nano Silver Round Brush.  It eliminates frizz and adds great volume.  What I love most about using this brush is the gripped handle.  It is great for all hair lengths (I used mine when I my hair was 18" long and I currently use it for my bob haircut).  The brand offers a variety of flat filtered brushes as well.  This brush is available at Sally Beauty Supply. (Always remember to clean and wash your brush once a week with antibacterial soap and warm water to prevent buildup.) 


Organix Brazilian Keratin Therapy Anti-Breakage Serum
3. Moisturizing Leave-In

Keeping your hair hydrated is very important, especially if you are treating it with heat.  You should always use a leave in treatment on wet/damp hair to protect during a blowout.  I recommend Organix Brazilian Keratin Therapy Anti-Breakage Serum.  This organic leave-in serum, leaves hair silky soft with no buildup or oily residue.  You only need a dime size amount unless you have thicker/coarser hair then I recommend twice as much.  The bottle lasts a long time and not only does it keep your hair protected, it adds protein and smells amazing!  It is available at most drugstores and Ulta.  You can view the full line of Organix Brazilian Keratin Therapy here. 

Aveda Volumizing Tonic

4.  Volume Spray

How do you expect to amp up your volume without a volumizing spray?  It is important to look for root volumizing sprays using natural products.  These sprays will keep from drying out your scalp and creating flakes.  I recommend Aveda Volumizing Tonic.  Spray this tonic on your roots and it will create volume like you have never seen.  This spray smells amazing and does not create any residue on  your scalp or hair.  It creates a natural volume wherever you spray it.  It is available at any Aveda salon. 


Salon Care Super Clips
5.  Separating Clips

You need to section your hair when performing any type of blowout.  Using clips without teeth is best to prevent hair breakage.  I recommend Salon Care Super Clips. I love the multi color metal clips with no teeth or exposed springs to snag your hair on.  They hold hair smoothly in place without breakage.  They are available at Sally Beauty Supply. 

There you have it, the Top 5 Voluminous Blowout Essentials.  I am sure your results will be as good as mine.  Have a Beauty-full Friday!

Monday, January 16, 2012

Product of the Week: Organic African Black Soap Shea Butter Lotion

The Mission 

I am always on the look out for a great moisturizer/body butter.  I have incredibly soft skin because I moisturize twice a day (once in the morning before I start my day and at night before bed).  I always make sure to pump some lotion into my hand before I curl into bed so I can moisturize my feet without sticking to the floor.  I always remember to moisturize after a shower because soap/shower gel removes all oils from skin.

The Discovery 

On a recent trip to Target, I came across this lotion.  I took a look at the label and used my nose to investigate the lotion.  The smell alone enticed me to want to purchase it.  It has a soft Shea scent.

What is African Black Soap?

African Black Soap originates in Ghana and is made from palm ash, tamarind extract, tar and plantain peel.  Black Soap has been used for centuries to treat many skin problems including acne, eczema, psoriasis and oily skin to produce flawless skin.  The soap achieves this by killing odor causing bacteria.

The Product

This particular lotion combines African black soap and Shea butter (along with oats, aloe & vitamin E) to moisturize skin.  It is completely organic and not tested on animals.

Uses

This lotion is amazing! I was a little skeptical about relieving skin issues (I have struggled for years with scalp psoriasis).  I started using the lotion after I showered because I loved the smell.  Although the lotion seems thick, once you apply, it glides on smoothly and moisturizes but does not leave a residue or oil behind.  About a week ago, I decided to try using it as my daily facial moisturizer.  I was a little afraid as I have combination acne prone skin.  I used it one evening before bed and when I awake the next morning it was like my face felt freedom for the first time.  My skin was soft, not overly oily and my blemishes were starting to vanish.  This sounds too good to be true but I promise you will not be disappointed with this lotion.   The only downside is that it is hard to get out of the bottle.  It does not come with a pump top so I have to shake and squeeze the bottle.   

Purchase 

It is available at Target and Walgreens for $9.99.  They both carry the full line of Shea Moisture products.

Friday, January 13, 2012

Top 5 Friday: Lip Balms


It's that time again, Top 5 Friday!  This week I listed my top five lip balms.  During the winter months, it is very important to keep your lips hydrated.  I always carry a few of these products in my purse at all times.  Scarlett Johansson wears lip balm over her lipstick to keep her lips moisturized while on the red carpet.  If you want to make your lips fuller, you can also lightly brush your lips with your toothbrush before applying lip balm.  This brushes away dead skin cells and activates the blood cells in your lips, making them appear fuller and a bit flushed. 


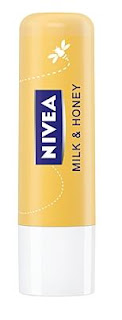
1. Nivea: A Kiss of Milk & Honey

This is my must have lip balm.  I carry one in my purse and keep another next to my bed.  I love the soft smell of honey and it makes my lips soft and silky.  This lip balm is available at any local drugstore (I buy mine at Target) for a few dollars or you can buy a variety pack of three Nivea lip balms at Ulta for $5.99


2. C.O. Bigelow Rose Salve

This is my second must have.  I keep this salve handy in my purse for any occasion.  The salve can be used for everything from elbows to hands to feet to lips.  It is a great product and a little goes a long way.  It has a very soft hint of rose aroma and super slick with a tiny bit of shine.  You can purchase this salve at Bath and Body Works for $5.50. 


3.  LUSH Sweet Lips Lip Scrub

Do not be fooled by the words scrub.  This "scrub" is also an amazing lip moisturizer.  You put a little scrub all over your lips, then use your fingertips to scrub.  Then you simply lick your lips, yes that is right, it is completely edible!  It takes like sugar with a hint of chocolate and makes lips soft.  This fresh made product is all natural so the jojoba oil naturally moisturizes your lips.  It is a great thing to keep in your bathroom cabinet to use in the morning or at night before bed.  You only need a very small amount and you can purchase it at LUSH for $8.95.   It is also available in a bubble gum flavor and mint flavor.


4.  Labello Strawberry Lip Balm

Every time I travel to Europe, I stock up on Labello.  This particular one is my favorite.  It gives a subtle tint of red with an amazing strawberry flavor.  Keep this one hidden from your friends because everyone will want to have it.  It is available on Amazon.com for $3.99.


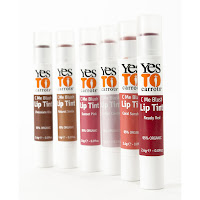
5.  Yes to Carrots Lip Tint

I am not normally crazy about a lip tint, but this one stole my heart.  The lip tint is 95% organic, and paraben free.  My favorite shade is now discontinued but they offer a variety of shades.  The greatest thing about this lip tint is that it has a hint of mint flavor.  They are available at your local drugstore (again I buy mine at Target).  You can also purchase them from Yes to Carrots for $4.49 each.  


There you have it my top five lip balms.  Try a few and let me know what you think.  Happy Friday the 13th everyone!

Wednesday, January 11, 2012

Add a Little Love to Your Bathroom

I have an addiction to products.  Especially hair and face products.  It has always been a problem for me to organize my bathroom sink because it always looks cluttered with all my products.  I came up with a solution.  I decided to give my bathroom a little love.  Here are my solutions for extra space without the visual clutter.

Over the Top Storage


I wanted to change up the color scheme in my bathroom.  As you can tell from the photo, a full transition has not been achieved just yet.  I decided on black, grey, and Celtics green! The first thing I did was purchase this inexpensive metal storage piece from Target. I placed a plastic basket on top of the tank and filled with extra toilet paper.  I am a firm believer in the toilet paper being visible and easily accessible for guests.

I purchased the three boxes from Ikea.  The two larger boxes were 2/$4.99 and the smaller box was 2/$3.99.  Let me break down how I used these boxes for storage. 

Box #1: Hide your little extras


I used box #1 to store bobby pins, little sample perfumes, room sprays.  Ok, now I know you are wondering about the white box.  It is filled with those feminine care products.  Reusing small boxes like this is a great way to keep those products hidden and tucked neatly away.

Box #2: Hide your perfume
I used box #2 to store all my perfumes.  They are easily accessible but are hidden away so that they do not take up space on your bathroom vanity.

Box #3: Hide your hair utensils
I used box #3 to store all of my hair brushes and combs.  They are nearby for easy access but are not visible and taking up space.


Top Shelf: Keep it simple with a candle that brings color
I bought this candle jar at a local discount store for $.75.  I added a large tealight candle purchased from Ikea a set of 12/$5.99.  When the candle is lit, it gives off a beautiful green glow and the vanilla scent lingers in the room.  


Use top of organizer to hang hair ties and headbands
I hung my hair ties and soft headbands on the top of the storage rack.  This is convenient for me to grab in the morning when washing my face or applying a face mask.  If you do not like the hair accessories visible, you can store them away when guests arrive in one of your three boxes.

  
Add an Extra Shelf

As I mentioned before, I needed somewhere to store all of my products.  I added a shelf to the wall to add that extra space.   I purchased the shelf at Ikea for $1.99 and the brackets for $.50 each.  I used plastic anchors and screws to attach the shelving to the wall.  I displayed my products on the shelf so they are easily accessible but not cluttering my vanity space when I have guests. 


I then added three pictures that I painted free hand (you can see how to do your own here).


I hope these hints were helpful in helping you save some space in your bathroom.  I definitely feel more organized!

After my added organization skills

Sunday, January 8, 2012

DIY: Picture Frames to Fit Your Style

A few months ago, I was browsing the aisles at Target when I came across a few clearance items.  To my surprise there were a few frames among the pile of items.  Each self standing frame held two photos, had no broken glass, just scratches on the black metal framing.  My creative light bulb lit up.  I could make these into anything I want.  So for a few dollars each, I purchased them.  Now that I am redecorating my apartment, I decided to use the frames on my bookcase at my walk-in.  My space is black, white, and red so I wanted to change up the frames.  Here is that experience.

Mosaic Tile Frames


You will need:

Picture Frames
Any old, broken, chipped, or even new will work.  You can also purchase them at Goodwill, Salvation Army, or any other second hand store.

Mosaic Tiles
80 Stone Tile set purchased at Michaels for $5 (use a coupon!)

Glue Gun/Glue Sticks


1.  Remove glass from frame.  Laying frame flat, lay out a pattern on your frame with the mosaic tiles.  I did alternating of white, slate gray and light gray.

2. Move your designs to the side but remember to keep in order.


3.  Here comes the tricky part.  I used stone tiles on metal so the glue does dry quickly.  You have to be ready to attach as soon as you apply the glue or it will dry.  Great thing is, that if you mess up, with a little strength you can remove the tile and glue and re-glue.


4.  Once you glue all the tiles on the frame, remember to pull all the extra stringy glue from the frame.


Add your favorite photos and you have created a simple masterpiece.  Everyone will think you purchased expensive frames but in reality you spent under $10 for both!  These also make great gifts and you can personalize colors for any space.

Purchase This Amazing Nail Polish For Only $1


On a trip to Germany a few years ago, I purchased a few Essence Colour & Go nail polishes for a few reasons, they were small to travel with, the colors were amazing, and they claimed to be a quick dry polish.  At only about $1 I thought I would give a few of them a try.  I fell deeply in love with these polishes.  The colors are amazing, they do dry fast, stay on as long as more expensive polishes and have a "wet" look.  I do not tell you about these polishes so that you can covet them and not have access to them.  On a recent trip to Ulta, to my amazement, I spotted the brand.  I was more than excited to purchase another polish for $1.  They do have fewer colors for purchase here in the United States and to my knowledge, Ulta is the only place they are available here in the States.  My favorite is "Sweet as Candy".  It is a softer pink color when on nails than shown but use three coats with this color as it is a little on the sheer side.  It looks fabulous for a neutral everyday color.  I also currently love "Walk of Fame", which is more of a taupe than it appears on the website.  It is a great warm tone for this time of year.  For $1 each go crazy and try them all!! 

Saturday, January 7, 2012

Display Your Accessories for Easy Access

The one thing in my life that has always been organized is my closet.  I take pride in my clothing and accessories and I like everything to be colored coordinated.  My scarf collection has always been something of an issue to display.  Here is my solution.


Accessory Display

You will need:

Hanging Rail 
Ikea for $2.99

S Hooks
Set of 10 at Ikea for $.99

Screws
1 1/4" purchased at Lowes

Plastic Anchors
1" purchased at Lowes

Phillips Screwdriver

Drill or Hammer

Level


1. Holding your bar on the wall, place your level on top of the bar.  Move the bar until it is level.  Use a pencil to mark the four holes on the rail.

2.  Drill a hole on each pencil marking. (If you do not have a drill, you can use a hammer and a screw to make the hole.  Once you hammer the screw in the wall, remove the screw with the hammer.)

3.  Place a plastic anchor in each hole.

4.  Place the rail on the wall.  Using your screwdriver, screw the screw into the four holes, attaching the rail to the wall.

5.  Hang accessories from the bar or hang by using the S hooks on the rail. 

There you go!! You have a beautiful accessories bar.  I used my bar display my scarves (color coordinated of course!) and my long necklaces.  You can hang hats, purses, scarves, jewelry, anything your heart desires.  The laundry bags you see can be purchased at Ikea for $4.99 each.

Friday, January 6, 2012

Top 5 Friday: Shampoos


I am constantly asked by friends and family about what products I use.  Everything from hair care to moisturizers to cosmetics.  Every Friday I will be posting my Top 5 of a particular product.  Shampoo is a great place to start.  I am a world traveler so a few items are international but are still available online.  Here we go.


1. One 'n Only Argan Oil Moisture Repair Shampoo

My current obsession is this amazing shampoo infused with Argan oil. For those who are not familiar with Argan oil, it is derived from the Moroccan Argan Tree. The oil, moisturizes your hair without the added weight.  This particular shampoo is sulfate free and leaves your hair silky smooth after just one wash.  The smell is better than any other Argan oil shampoo I have come across.  It is also safe for color treated hair as it leaves your hair soft with no buildup or extra oil.  You only need to use a small amount so it is a great value at around $10.  I purchase this shampoo at a local Sally Beauty Supply but it is also available at your local Ulta.   


2Schwarzkopf Bonacure Q10 Time Restore Shampoo
Ok I know that you are puzzled why a mature hair shampoo made number two on my list.  This shampoo will change every thought you have ever had about your hair.  The website claims, "Q10-PLUS-COMPLEX stimulates the production of vital keratins that would otherwise have been lost over time hair - making true beauty timeless."  It transcends that statement.  A few years ago, I realized my hair was not growing as fast or thick as it did in my youth.  It puzzled me, I am in my twenties and my hair was slowly thinning and growing at a slower rate.  I saw this shampoo at a beauty store in the local mall.  I am a very big fan of any Schwarzkopf products and when I realized it is supposed to stimulate growth, I thought I should give it a try.  Not only does it make your hair grow faster, but it is a great moisturizing and thickening shampoo!  This is also great after removing extensions because it helps to regrow the hair you lost.  It is available on Amazon.com and at specialty salons.   

3 Schwarzkopf Gliss Kur Liquid Silk Gloss Shampoo
Five years ago, on one of my many trips to Germany, I forgot to pack conditioner.  When my best friend took me to the market to find a conditioner, I stumbled upon this brand.  I must admit that at the time I picked it for its soft gentle aroma but I soon came to realize it is an amazing moisturizing shampoo.  The smell leaves your hair perfumed but not with an overpowering scent.  The scent is reminiscent of a grown up version of baby powder.  It leaves your hair silky soft but is also suitable for fine hair.  This particular type of shampoo by Schwarzkopf is not readily available in the United States, however it is available on Amazon.com if you are lucky enough to acquire a bottle before they sell out on a weekly basis. 

4. Frederic Fekkai Essential Shea Shampoo
Frederic Fekkai is a genius.  My younger sister will tell you that I have sworn by this shampoo for years! I am always on the lookout for moisturizing shampoos that do not weigh the hair down.  This is top notch!  The smell is great, you only need a small amount to silken your tresses and the immediate change in your hair texture will impress you.  If you have never tried a Fekkai product, you do not know what you are missing.  All of the products and lines by Fekkai are amazing.  I also recommend the Brilliant Glossing Shampoo for a little more shine and the Protein Rx Reparative Shampoo for those tresses that need a little extra love.  This shampoo is available by various retailers, including Ulta and Nordstrom.


5. Henna Egipcia Shampoo
While on a weekend trip to Mexico this past summer, I was so excited to scour the supermarket for beauty products.  This is my tradition when I visit any country, I want to know what products they offer that are not available in the United States.  I came across this shampoo.  It comes in different types for different hair colors.  Being a blonde, my particular bottle is "Dorado".  The smell is amazing and it really leaves my hair moisturized and glossy.  It makes my tresses soft without any buildup.  This product is made and sold in Mexico but can also be purchased online at Amazon.com.  They sell out fast and the colors vary but if your color is sold out, keep checking back for new stock.


I recommend not using a single type of shampoo for more than two months.  After around two months, your hair will not respond to a particular shampoo the same way it did in the beginning.  This is why I like to keep three types of shampoo to use in rotation to keep my hair fresh and new.  I hope my list was helpful and I look forward to your feedback! 
 

Wednesday, January 4, 2012

Make Your Eyes Stand Out With a Less Expensive Alternative

I have been a Dior Diorshow Black Out Mascara addict for years now.  I have long thick eyelashes but I have blonde hair.  See the problem?  When I wear mascara, you can see the roots of my lashes.  My younger sister takes care of this by having her eyelashes dyed (which you can have done at your local Aveda salon at a low cost).  For me, it has not come to that yet but I have decided that my Dior mascara needs to take a little break.  Mostly because it tends not to last as long and costs around $25.  Although nothing will be able to replace the look it gives my lashes (full, no clumps, long lasting, no running, and super super super BLACK pigment).  I slowly started to look for a cheaper alternative for everyday use.  I thought if I could find a daily replacement, I could save my Dior for those Dior moments in my life.  I am here to let you know, I have found a suitable alternative.  The CoverGirl  commercial with Taylor Swift caught my eye.  The newest mascara claimed to be light and use beeswax to keep your lashes light.  On a trip to Target, I breezed through the cosmetics aisle straight to the CoverGirl products.  Alas, there it was, CoverGirl Natureluxe mascara.  I scanned past the usual tones offered (including black), and as the choir of angels sounded, very black!! Only $7.99.  I could not wait to purchase my new mascara and take it home for testing.  I was amazed and happy to report that it works just as well as my Dior. 

I do recommend that you do not purchase the waterproof.  Waterproof mascaras tend to dry out your lashes and contribute to breakage.  This is why many women feel wearing mascara makes their lashes thin.  Make sure to not only moisturize your face everyday but also show your lashes and eyebrows some love too.  I hope you have the same luck I did with this product.  Take my advice, think of your mascara as you do your heels, you need an everyday pair and a special occasion pair.

Tuesday, January 3, 2012

Making Your Own Artwork

I am always on the lookout for artwork for my apartment.  I am very picky and the only artwork currently on my wall consists of framed vintage Bruce Springsteen posters, an Audrey Hepburn poster, and the LIFE magazine photo of JFK and RFK.  As many of you know, I am redecorating my large living space and I am in need of some new/creative artwork for my walk in area.  I was inspired by this link I saw on pinterest.  I made it my own and here are the results.  Enjoy!!

Custom Artwork


You will need:

Canvas
(I bought a set of 7 square ones at Michaels for $11.99)

Acrylic Paint
(I used a basic black, you can use any color that matches your space but make sure it is Acrylic paint)

Fabric Paint
(Match the color to your acrylic paint or use an opposing color for a more pop art look.  I used the Slick type to make my designs pop more)

Mod Podge
(any type) 

Foam Paintbrush
(I recommend the foam brushes because bristle brushes can break off stick to your paint)

Fine Paintbrush
(this is for gluing the design to the canvas, the smaller your fabric paint strokes are, the smaller brush you will need)

Designs
(I used animal print, so I googled animal prints to find my patterns and then printed them)

Scotch Tape

Wax Paper

1.  Cut your wax paper according to the size of your canvas.

2.  Using your sponge brush, paint your canvas with acrylic paint (using black, I had to paint three coats)


3.  Lay out your design and tape it down to your workspace.  Lay the wax paper over the design and tape in place.
 
4.  Trace over the design on the wax paper with your fabric paint.  I am right handed so I started from the left and worked my way right so that I would not mess up the design.  I used a canvas that was larger than my printout so I had trace the design, remove the tape from the design paper and tape it down again.  Then I traced the right side of the design.  Let the fabric paint dry overnight.


5.  The next day, carefully remove each design from the wax paper.  MAKE SURE YOU WAIT OVERNIGHT OR THE PAINT WILL NOT BE DRY!!

6.  I followed the shape from the wax paper when I placed the design on the canvas.  Once I placed my designs on the canvas, I glued the designs one at a time on with mod podge and a small paintbrush.  I used the end of the paintbrush to tap down on the design so the glue would stick and to protect my hands from sticking and pulling the designs off of the canvas.  Let dry overnight!!!


 For me, I wanted to do a zebra print and I tried doing it as seen above, but the lines were so complicated to lay down on the canvas.  I free handed that design with fabric paint onto the canvas.  Once you practice you can do this with any design!!!

Click photo to see my masterpieces!!!